
 It is universally acknowledged that mosaic is one art form that people are more inclined to touch than any other. We are drawn to it, we want to run our hands along it's smooth cool surface. There is something calming and sensual about it.
Your hands are the best judge in determining whether it is a well crafted, functional, quality mosaic. It can be very discouraging to to spend hours creating a piece (or spend your hard earned money purchasing a piece) only to watch people grimace as they touch it or quickly pull their hands away from it because of sharp or uneven areas of the surface.
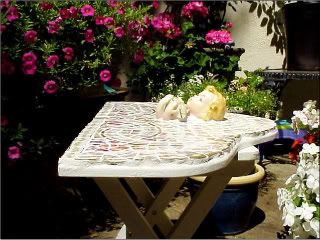
We want to incorporate art and beauty onto a function piece that we use our every day lives. The last thing I want is a surface that scratches or cuts my fingers, or worse still, topples my glass of wine!
Before I address how to level and smooth your mosaic surface, I feel I should briefly mention a couple pointers that both a beginner and novice should always consider before tackling a mosaic project.

Second, before you even being to adhere your first china tile, be sure you have primed and then painted the piece. It is far more difficult to paint your piece after you have finished laying your mosaic design. Be sure to cover the area of the base you will place the mosaic, do take care not to get any of the top coat in that area.
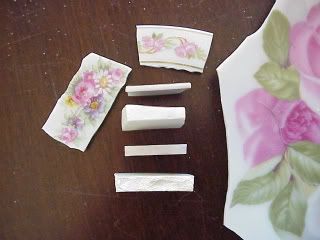
Now, always place the thickest piece first (the anchor) and level the thinner pieces to it. After you have placed or thickest tile, if the next tile is the least bit thinner, butter a bit of thinset on the back of the thinner tile, then place that buttered tile on the base. Next, hold the press over the thickest (anchor) tile and the freshly placed tile, then gently press down until your "press" rests on the thickest china tile. (Be sure that the anchor is always as near to the center of the press as possible.) To know if you have used the appropriate amount of thinset, after you pressed, some of the thinset will oozed out the bottom of tile, if you don't see any, add a bit more thinset to the piece and press again. With a little practice you will do it with ease in no time at all
I have found that it is best to press one piece at a time, and most importantly, clean off the excess thinset from around the bottom of that tile and off the press. If you don't it may hinder the placement of subsequent tiles. (I use toothpicks to clean off the excess thinset)
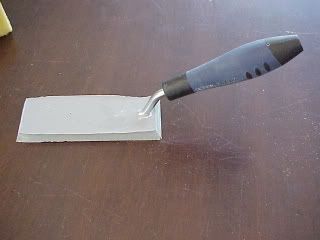
Be sure the press size is appropriate for the piece you are working on. I have several different press sizes: 4" x4", and 8" x 4" and my table/count/dresser top base press which is about 18" x 12".
Now, you may think, why not just spread the thinset is a small area and place several tiles down and press them all at once. Been there, done that! The bloody cleanup was a nightmare! The longer thinset stays on the tiles, the harder it becomes. By cleaning the tops of tiles before the thinset underneath the tile has harden you will risk pushing that tile down lower than the other tiles. Also, most thinset do not dry white, so having too much thinset in your grout lines will darken white grout.

A sponge or damp cloth will remove too much grout if you aren't careful. I use a small rubber float. I lightly squeegee some grout off the surface of the mosaic with the edge of the rubber float, then I clean each china tile one by one, doing my best to avoid the grout lines. I use a damp paper towel. I find that a soft cloth is too thick and you inadvertently wipe off too much from the grout lines.
Before smoothing out any sharp corners of the tile, clean the surface of grout residue, then let the piece dry completely. After the piece has dried, using your fingers and palm, lightly feel around the piece for any sharp tile corners. A quick touch of a dremel will smooth it out. I recommend a dremel over a drill as it is easier to lightly grind off that sharp corner without hitting the grout line or taking too much off the tile. If you don't have one and do not wish to invest in one, see if you can borrow one. Otherwise you might try a metal file.
If you have any questions, feel free to email me. I will be happy to clarify or provide more detail.
For more topics, instructions and helpful hints, a table of contents is provided at the top of the left margin, entitled "How To's" just click on the topic of interest.

7 comments:
This is wonderful! Such valuable info, & explained so clearly! I'm going to return in the morning and read over it again. I've already gleaned a couple of 'tidbits' that I wasn't aware of.
I'm one of your contacts on FlickR. You're off to a great start with your blog!!
I have a blog also, but main blog isn't the crafts blog. Stop by when you have time.
Mimi
Thank you so much Mimi! Give me your blog addy and I'll be happy to add it!
http://susansspace08.blogspot.com/
I'll add yours to mine, too!
Thanks for stopping by! S: )
Tina,
I loved this great step by step post. I am ready to go mosaic something now! Cathy
Hello,
My name is Theo. I am new to blogging I noticed that we have similar interest. I think it would be beneficial to both of us to exchange links. Please send yours so I can do the same.
My email is cleanpros@live.com
Thank You
I wish not approve on it. I think warm-hearted post. Specially the title-deed attracted me to read the intact story.
Amiable fill someone in on and this fill someone in on helped me alot in my college assignement. Say thank you you on your information.
Post a Comment