 I am joining in on Metamorphosis Monday, hosted by the fabulous Susan @ Between Naps on the porch.
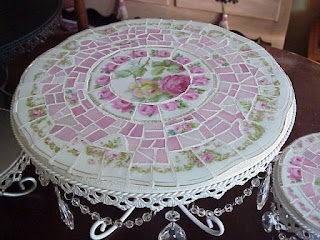 When I first started creating broken china mosaics, a.k.a. Pique Assiette, there was very little information available. I had many questions and very few answers or helpful hints to reference. After much trial (and error), I found my own way.
I've created a How To in order to share some helpful hints and instructions that I learned through trial and error. This tutorial will give you an overview of the basics steps.DISCLAIMER: I am more than aware that art is a very subjective word. I just want to clarify my distinctions. My form is smooth, level, surfaces. I use professional grade grout and adhesives, I nip my own china and create my own focals. It is my intention to create pieces that will last through generations.
If you want to create heirloom pieces, here are a few key things to keep in mind:
FIRST: DO NOT SMASH YOUR PLATES WITH HAMMERS!! Leave the hammer to the nails. ha!
SECOND: QUALITY MOSAICS REQUIRE TIME. Do not expect to finish a quality piece in a day or even a weekend. THE BASICS STEPS:


1. Prep Your Mosaic Base ~ this is necessary to give the thinset/mortara something to grab onto. Depending on the surface, you will need to sand and then apply a primer, or just a light sanding is all it will need.
2. Creating/Selecting Mosaic Tiles, Mosaic Focals, Laying Out Design ~ this is where you gather all of your nipped china tiles and focals, determine which method of you will use to create your Mosaic design and layout a design.
You can always nip tiles as you go, but I recommend that the basic china tiles and focals be laid out.

If you are using the direct or my direct press method, it is not necessary to layout all of your fill pieces; unless you are going to use different color fillers and want to be sure you are satisfied with the color combination. This is also your opportunity to see which tiles are the thickest. Do try to avoid extremes in the widths.

If you are using the indirect method, this is the time you will layout the design including the fill pieces before you transfer them face down into a mold or onto your contact paper or mosaic mount.

3. Adhering Tiles To the Mosaic Base ~ For direct or my direct press methods, you will be using mortar or glue, be sure to always begin with the thickest focal or tiles first. These will be your anchor and sets the height for the rest of the tiles and focals.

Use glue to set the anchors and thinset/mortar for the focals and tiles that are thinner.
For the indirect methods, this is where you will pour the wet concrete into the mold, or press the prepared section onto the mortared base.
4. Prep for Grouting ~ after the thinset/mortar has set for at least 24 hours, it is time to tape off the base to protect the paint finish from the wet grout.

Painters tape is most effective.

5. Grouting The Mosaic Base
~ Mix and apply the grout. (instructions and photos available at my "How To's" tutorials).

Let dry for 15-20 minutes then clean the film off the tiles and focals.

Remove any painters tape.

6. Sealing the Mosaic Design ~ After the grout has cured (at least 72 hours) it is time to thoroughly seal the grout to protect it from stains and moisture. If you haven't filed or dremeled the sharp edges, be sure to do it before sealing.
7. Signing Your Mosaic ~ Always sign and date your creations. I use gold or silver paint pens. I usually sign the bottom of the pieces directly under the mosaic design.
There you have it. My 7 basics steps to creating a beautiful mosaic piece that will be cherished for years to come.
For a more detailed step-by-step instructions, feel free to visit my How To page here. There is also a link located under my blog header. Just click the "How To" box.
I always stress that it is best to start small. A lazy susan is inexpensive and ideal. You can also try a small wooden tray. Most are helpful hints. Once you get started, you will quickly develop your own methods and practices. It truly is easier in practice than on paper, or in this case...monitor. ha!
At the very least, you will be more aware of what to look for if you are considering purchasing a mosaic piece. As I've said many times before, your hand will be the best judge of quality in the craftsmanship of the piece.


As you glide your hand across the surface of the mosaic, it should feel good to the touch. If it is rough, uneven, jagged or sharp, your hand will let you know instantly.
My vintage china mosaics are available in my Etsy shop here.Please note, my content is copyright with exclusive rights. Please do not copy my content (text, photographs, illustrations) into any printed form or any form of publication.If you have any questions, please feel free to email me. I am more than happy to help!
Happy creating! 

 Happy Pink Saturday everyone! Thank you so much to our fabulous Beverly of How Sweet the Sound for hosting!


